
There are three reasons for load-balancing:
- get more performance
- being able to serve more users
- being agnostic to server-outage
In modern cloud computing, we are also thinking about elasticity, the ability, to save money by spinning down unnecessary resources in off-peak hours.
Load-balancing can do all this.
Objects:
- Servers (the representation of a real host, a web server, a database server, what ever)
- Services (the representation of service running on a real host, i.e. the http deamon, postfix, …)
- Service groups (similar to services but point to services located on several real hosts. I usually prefer service-groups over services for convenience and to get a consistent deployment).
- Load-balancing vServers (the ressource, users are connecting too).
We have to create servers, create services or service groups, and bind these to lb-vServers.
What load-balancing looks like:
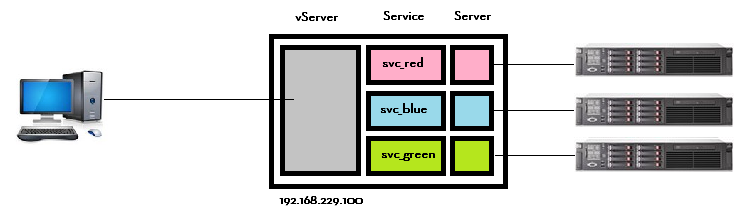
I call the actual webservers “real servers” or “physical servers” (even though, most of them will be virtualized). Our real servers host the applications.
We have to create server objects in Citrix ADC / NetScaler first. Server objects are quite stupid, their mail property is an IP address or a host-name.
Next step is creating services or service groups. They are specivic to a certain protocoll (http, tcp, RADIUS, mySQL and many more). In addition they specify a port (80, 443, 53, …). Services and service groups are intelligent objects.
The last thing is the vServer, the virtual server users are connecting too. Their properties are IP addresses (VIP), ports, protocols, load-balancing method, persistence and many more.
Important!
 Load-balancing won’t work as long as we did not enable the feature. This can be done by clicking the menu item load balancing and than enable feature!
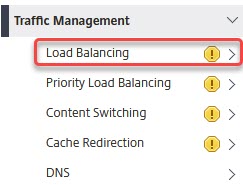
[wpedon id=”798″ align=”center”]